=[http://atosaca.co.cc This Page Is Currently Under Construction And Will Be Available Shortly, Please Visit Reserve Copy Page]=
----
=[http://atosaca.co.cc CLICK HERE]=
----
</div>
By augmenting a [[Graphics:Sprites|sprite]] with additional information, we can create an object that is ready for placement on the map: a model.
By augmenting a [[Graphics:Sprites|sprite]] with additional information, we can create an object that is ready for placement on the map: a model.
Line 15:
Line 23:
To align a sprite with the shapes, an additional offset can be specified. This offset is only 2-dimensional, since from the renderers perspective, depth and height (y and z axis) are the same.
To align a sprite with the shapes, an additional offset can be specified. This offset is only 2-dimensional, since from the renderers perspective, depth and height (y and z axis) are the same.
To aid with the construction of models, the <tt>modeller</tt> tool has been created. There is a [[Tools:Modeller:Tutorial|tutorial]] providing step-by-step instructions to its basic functionality and a more detailed [[Tools:Modeller:Editing|reference]] explaining all of its features.
To aid with the construction of models, the <tt>modeller</tt> tool has been created. There is a [[Tools:Modeller:Tutorial|tutorial]] providing step-by-step instructions to its basic functionality and a more detailed [[Tools:Modeller:Editing|reference]] explaining all of its features.
By augmenting a sprite with additional information, we can create an object that is ready for placement on the map: a model.
Purpose of Models
A model combines the graphical representation of an object with a physical shape. As explained in the chapter about in-game graphics, sprites are drawn to give a 3-dimensional appearance to the game world. Internally, the engine uses indeed a (simple) 3-dimensional representation for the purpose of collision detection and rendering. The shape of each model is used to build this internal 3D representation and the sprite is used to visualize it on screen.
As such, it is important to understand how sprite and shape fit together, as only precisely built models will ensure a game world where characters won't get stuck or fall through the ground and where objects are rendered without glitches.
Construction of Models
Example Models
Since the 3D representation will not be visible directly, it does not have to be very detailed. Therefore, the basic shape is a simple cube. It can be deformed to match the actual sprite and, where necessary, multiple cubes can be used to represent more complex sprites.
For non-rectangular sprites, individual corners of the cube can be moved freely in space and even onto each other to make diagonal or triangular shapes. Note however that it is not allowed to make completely flat (i.e. two-dimensional) shapes, as collision detection will not function properly around those. So even floor tiles will have to have a certain height.
To align a sprite with the shapes, an additional offset can be specified. This offset is only 2-dimensional, since from the renderers perspective, depth and height (y and z axis) are the same.
To aid with the construction of models, the <tt>modeller</tt> tool has been created. There is a tutorial providing step-by-step instructions to its basic functionality and a more detailed reference explaining all of its features.
Conventions
All models created for Adonthell should adhere to the standards described below, as it will ensure that everything will line up correctly.
Floor
Floor tiles should have a length of 64px and a width of 48px or multiples thereof. 64px by 96px and 128px by 96px are common sizes.
The height of floor tiles is 5px, with an offset of -5px. That means, a ground tile places at z = 0 will have its surface at z = 0 as well, which is more convenient when building maps.
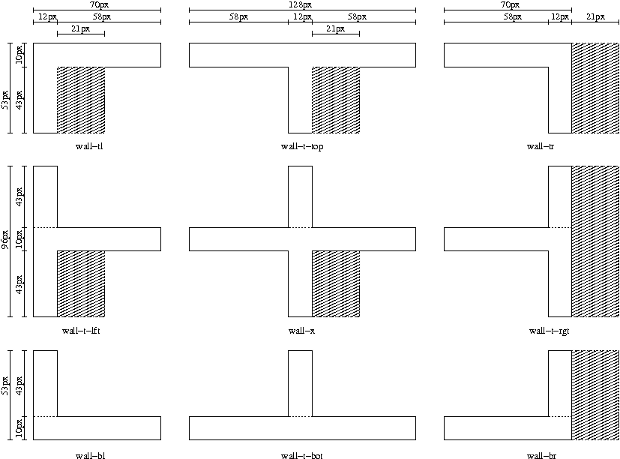
Walls
Wall tiles in general have a height of 100px.
Horizontal walls are named wall-h and have a length of 128px and a width of 10px. There can be a wall-h-small variant that has a length of 64px instead.
Vertical walls are named wall-v and have a length of 12px and a width of 96px. Again, a small variant would be named wall-v-small and have a width of 48px.
Corner and intersections are shown in the image below. Wall tiles seen from aboveThe dark areas indicate shadows that can be added for ground-level wall models. They need to be an extra sprite with a non-solid shape of height 2px and length and width as indicated by the image above. Dotted lines indicate where multiple sprites are required to compose that particular wall model, as the renderer will not be able to handle it correctly otherwise.
Doorways
Doorways are handled mostly like walls, except they are called doorway-h or doorway-v. They have the size of horizontal or vertical walls, with an opening of 64px for horizontal and 48px for vertical doors. In both cases, the height of the opening should be 90px. For vertical doorways, a matching shadow will help indicate where the opening is located as it will not be directly visible with the top-down view that Adonthell uses.