Tools:Mapedit:Grid
Jump to navigation
Jump to search
The Grid Dialog
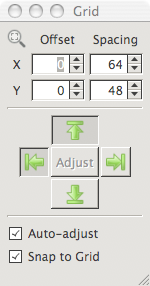
When placing models on the map, the grid control is the most important tool, as it allows to properly align different kind of tiles with as little hassle as possible. The grid dialog offers three distinct functional groups, which we'll explore from bottom to top:

- Grid Options:
These control the basic operation modes of the grid. Snap to Grid allows you to either align objects to the grid or, if unchecked, to place them freely on the map with no alignment at all. Auto-adjust, if turned on, means that the grid will automatically change to reflect the object you are currently placing on the map. This mode is best suited for placing ground tiles. If you need more control over the grid, but still want things to align nicely, you should turn this option off. - Alignment and Adjustment
Once Auto-adjust is toggled off, the five buttons in the dialogs center will become your friends. Press Adjust whenever you want the grid to re-align to the currently selected object. Note that if you select an object directly from the object browser, the grid offset will be set to zero. Pick an object from the map instead and the offset will be set accordingly. The arrow buttons control which sides of the current object will be aligned to the grid. Click either left/right and top/bottom to pick the desired side. Note that there is a third option for each axis that will become active when neither of the two explicit options is selected: center. - Direct Grid Control
Finally, you can see and adjust the grid directly. Spacing is the amount of pixels between two lines of the grid. Offset specifies the grids location in respect to the origin (0, 0). Note that pressing Adjust or selecting a different object while in Auto-Adjust mode will override any values entered directly.
Working with the Grid
The correct grid settings depend on the type of object(s) you are currently placing on the map. As there is no setting that is ideal for every type of tile, the following use cases should give an idea how to use the grid effectively.
- Placing the floor
All standard floor tiles are supposed to mix and match in regard to their size (multiple of 64x48). Auto-adjust mode is at its best in this situation. - Placing walls
Walls are standardized too, but corners, straight walls and t-segments all have a different footprint. Turn off Auto-adjust, manually Adjust to the wall-piece you want to add to and use the four align buttons to align the new piece correctly. Now Adjust, pick the next wall piece, rinse and repeat. Of course, placing a row of straight wall pieces will work without adjustments to the grid. - Placing clutter
Furniture, plants, rocks and the like can be placed freely on the map. Turn off Snap to Grid for that. Alternatively, turn off Auto-adjust and manually specify a small-sized grid by entering desired values for Spacing, i.e. 8 by 6.