Tools:Dlgedit:Editing
After finishing the tutorial you should be able to start designing dialogues right away. But for your convenience, and because some of the advanced editor features are not described yet, this section contains the complete reference guide.
Command line switches
Although <tt>dlgedit</tt> is a graphical editor, there are a few command-line options you may find useful at times.
-c compile all SOURCES and exit
If the -c option is specified with a list of dialogue source files (recognizable by their .adlg suffix), these sources are turned into python dialogue scripts without invoking the graphical editor.
-d print project directory and exit
A dialogue is usually assigned to a certain project, i.e a game. The project directory tells <tt>dlgedit</tt> where to search for things like character and quest data needed to compile dialogues.
-p project specify a default project
Assigns the given project to new dialogues, or to dialogues that do not belong to a project yet. To properly compile dialogues, they usually need to belong to a project. Works in combination with the <tt>-c</tt> option.
-g path specify a custom project directory
If your project/game does not reside in the default pro ject directory (which can be queried with the <tt>-d</tt> option), you can specify an alternative path with this option.
-v print version number and exit
You may specify a list of dialogue sources on the command line. Unless the <tt>-c</tt> switch is used, all of them will be opened in the editor. If no sources are given, it will start with a new, blank dialogue.
The Main Window
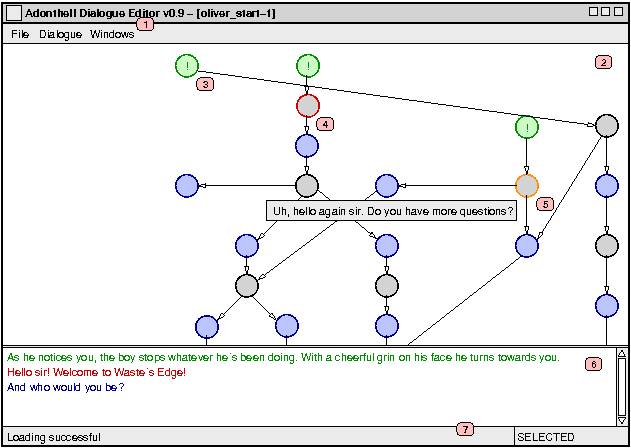
1. The Menu Bar
- The File menu allows you to load and save dialogues. Multiple dialogues can be open at any time, in which case you can switch between them with the Window menu. The remaining menu options, mainly those in the Dialogue menu described below will operate on the dialogue currently displayed in the Dialogue Area.
- Settings This brings up a configuration dialog for pro ject specific options. See the Project Management chapter for details.
- Python Code This dialog lets you add arbitrary Python code to the resulting dialogue script’s constructor and destructor. The Python Scripting chapter explains in more detail what can be achieved with this.
- Preview Translation This option is only available when <tt>dlgedit</tt> was compiled with national language support (NLS). It allows you to load a binary catalogue file (with a .mo suffix) to see how well the translation has turned out. While in preview mode, indicated by the word <tt>PREVIEW</tt> in the StatusBar, no editing is possible. To return to normal editing mode, chose Dialogue->Exit Preview mode.
- Compile Create the Python dialogue script used by Adonthell from the current dialogue. Note that the dialogue in its current form will be compiled, not the version that might have been saved to disk earlier. If the compilation was successful, a <dialogue>.py file will be created next to the <dialogue>.adlg sourcefile.
- Execute Not yet implemented.
2. The Dialogue Area
- This is where you create the outline of the dialogue; what lines of text exist and how they are linked to each other. Most of the work is done with the mouse, but there are also a few shortcuts on the keyboard and some functionality is available through the keyboard only.</p><p>The actions taken when a mouse- or key-press occurs depend on the current selection (none, circle, arrow) and the position of the cursor. The table below shows the possible constellations:
| Left-click | Nothing selected | Circle selected | Arrow selected |
| on empty space | Create new circle | Create new circle and link with selected | - |
| on circle | Select circle | Link with selected | - |
| on arrow | Select arrow | - | - |
| Middle-click | Nothing selected | Circle selected | Arrow selected |
| on empty space | - | Edit selected circle | - |
| on circle | Select and edit circle | Edit selected circle | - |
| on arrow | Select arrow | Edit selected circle | - |
| Right-click | Nothing selected | Circle selected | Arrow selected |
| wherever | - | Deselect circle | Deselect arrow |
| Enter | Nothing selected | Circle selected | Arrow selected |
| wherever | - | Edit circle | - |
| Del | Nothing selected | Circle selected | Arrow selected |
| wherever | - | Delete circle and its links | Delete arrow |
| Esc | Nothing selected | Circle selected | Arrow selected |
| wherever | - | Deselect circle | Deselect arrow |
- Further key-commands are <tt>c</tt>, which centers the view on the selected node if it lies in the outer 20% of the Dialogue Area, <tt>w</tt>, <tt>s</tt>, <tt>a</tt> and <tt>d</tt> to switch the selected node without using the mouse. Moving the mouse close to the Dialogue Area’s border will scroll the dialogue, as do the <tt>cursor keys</tt>.
3. Node with additional code
- An exclamation mark (!) inside a circle means that the node contains commands other than just a line of text. What commands that may be is explained in the Edit dialog description and the chapter about Python scripting.
4. Selected Node
- Selected nodes are outlined red. Furthermore, the Instant Preview shows the text associated with the selected node, as well as that of it’s predecessors and followers.
5. Highlighted Node
- Nodes below the mouse-pointer are outlined orange to give feedback on what action a mouse-click will start at this point. Whenever a circle is below the mouse-pointer, a tooltip with its text appears to make it easier for you to find a certain position in the dialogue.
6. Instant Preview
- This shall give a first impression of what the dialogue will look like in the game. Basically it displays the text of the selected circle, together with all preceding and following lines. With this you should be able to judge whether all the combinations of text will fit together well. Furthermore, by clicking on a line of text, the attached circle is selected, meaning you can browse through the whole dialogue. Note that conditions of nodes won’t be taken into account here. They will only take effect in the game.
- The coloring of the text is the same used for nodes in the dialogue area. The line belonging to the selected node is drawn red, the others according to their type: green for Narrator nodes, black for NPC and blue for Player nodes.
7. Status Bar
- The status bar displays help and diagnostic messages. To the right, it shows the current mode of dlgedit: <tt>IDLE</tt> when no node is selected, <tt>SELECTED</tt> when a node is selected, <tt>DRAGGED</tt> when a node is being dragged and <tt>PREVIEW</tt> when previewing a translation.
The Edit Dialog
This is the window that pops up when creating a new, or when modifying an existing circle.
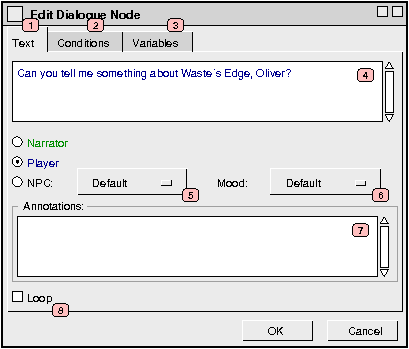
1. Edit Circle's Text
- Here you can edit the basic properties of a Circle: what text it contains and to which character it will be assigned. There’s also room for a comment, either for you as reminder or for others that will be working on that dialogue.
2. Conditions for the Node
- On this page, you can specify a condition which then decides whether this line of text will be available in the game or not. Conditions will be evaluated before the text is being displayed, so you should limit yourself to a single (but not necessarily simple) <tt>if</tt>-statement, like:
if condition_1 == 1 and (flag_1 + flag_2) <= 10:
- If a node has siblings, you may use complex <tt>if-elif-...-else</tt> statements between them. It is important that those statements appear in the right order though, otherwise you’ll get errors when compiling the dialogue. Refer to the section about node order for more details.
3. Arbitrary Python code
- Here you can enter a variety of Python code. In contrast to the condition, this code is executed only if the line of text is actually picked. Code placed here can be used to change quest objects, NPC or Player attributes and much more. See the section about Python scripting for more information.
4. Assign text to Narrator, NPC or Player
- Use the radio-buttons to assign the text you entered to either the Player, the Narrator or to some NPC. The editor tries its best to guess to whom this line of text shall belong, but it won’t be always right, of course.
5. Set NPC
- If the text is assigned to a NPC, you can explicitly set the speaker by selecting him or her from the drop-down menu. If you leave the setting to Default, the speaker will be the NPC to whom the dialogue is attached in the game. To allow conversations between multiple NPC’s, you might want to chose somebody else though.
- What NPCs will be available depends on the project the dialogue is assigned to. They are read from the character.data file residing in the project directory. The chapter about Project Management provides more information.
6. Set NPC’s mood
- Not yet implemented. The purpose of this feature would be to display different portraits for the selected NPC.
7. Annotations
- Here is some room for personal notes of all kind. Since a dialogue can get quite complex, you really should add some comments, so that other people as well as you can easier understand what is going on.
8. Loop
- When checked, the node will not be marked as used once it has been uttered in the conversation. That means, it will appear again, and thus loops will be made possible. If left unchecked, any line of text that has been uttered will no longer be available during the conversation.
- Note that all lines of text will become available again once the dialogue is restarted, regardless of that option.
Node Order
For many dialogues, it will be required that the alternatives following a line of text are in a special order. For example, an alternative to end the dialogue should always appear last. Also, if <tt>if-elif-...-else</tt> structures are used in node conditions, it is important that the statements are given in the right order.
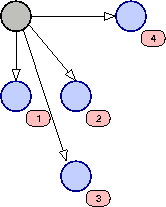
Node order in dlgedit is deduced from node position. Sorting is from left to right and top to bottom. The example above demonstrates the ordering of nodes.
Loops
If you create a piece of dialogue like the one below, you will find that the conversation will stop once the node marked with ’1’ is reached the second time. The reason for this is simple: as it is rather unnatural when parts of a conversation can be endlessly repeated, the dialogue engine remembers all lines of text that have been already uttered by a participant and prevents them from coming up again. So by default, creating loops is impossible.
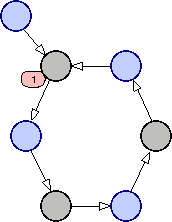
Should looping become neccessary for any reason – be it a special stylistic twist of the dialogue or anything else – a node can be explicitly omitted from the general rule by checking the Loop item in the Edit window. Any such node will be marked with an ’o’ and will always appear in the dialogue, no matter how often it has been traversed.
Random NPC Speech
At times it might be desired to have some variation in the NPC’s part of a dialogue. There might be different openings of the conversation for example or otherwise random behaviour of a NPC. For this purpose, it is possible to create several concurrent NPC nodes without any conditions applied to them. The engine will then randomly chose one of them whenever it has to determine the next line of the dialogue.
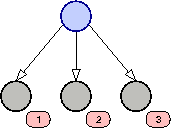
In the example, either of the nodes ’1’ through ’3’ would be picked whenever that point in the conversation has been reached. Note that the principle of avoiding repetition explained above applies in this case too. The node randomly picked by the engine will become unavailable for the remainder of the conversation unless it is explicitly set to loop.
Advanced Editing
After a circle or arrow has been created, it is not condemned to be immutable. You have already seen how a circle’s properties can be edited later on and also how to delete nodes.
However, circles can also be moved around, and arrows can be re-attached to different circles. This is important, as node position determines the order in which lines of dialogue will appear. By moving nodes to a different position, you can change this order. The instant preview will be updated to reflect the new order.
To drag a circle to a new position, it needs to be selected first. Afterwards, keep the left mouse button pressed and move it to its new position. Releasing the mouse button will affix it there.
Arrows can be moved in a similar fashion by dragging them either by their head or tail. That way, the dialogue’s flow can be changed without the need of deleting and recreating connections between different circles. Dropping an arrow onto a node will connect it to that node, if the connection is allowed. You cannot connect two player nodes for instance. If you drop the arrow onto empty space, the previous connection will be restored.