In the previous sections we’ve seen rules and guidelines on how to design the plot. The
remainder of this document deals with putting it to paper; so please read on if you are
working on an “official” game.
Contents
First of all, we have to sort out what belongs into the plot documentation. Basically, there
are three different parts: characters, locations and activities.
Characters that appear in the plot should be described in some fashion, no matter whether they are player or non player characters. As stressed above, NPCs need a background and various other traits. This will give the artists an impression of a character and will further aid writers with dialogues and plot design in general. <br> Character descriptions may be given in any form, in varying detail, depending on the character’s importance for the plot.
The location part covers the game world’s appearance. Places required by the plot have to be described in any case, but other areas or landmarks may also appear. Therefore, this part will be the main source of inspiration for graphic artists and map designers. To give them the freedom they need, descriptions shouldn’t include more details than necessary. <br> Locations can be described in text form, by sketches or maps. If a quest requires a location to have a certain layout, this should be pointed out, possibly together with a link to the description of that quest.
Activities are the core of the plot documentation. They describe the player’s options at any given point in the game. They should refer to locations and characters as needed. No difference is made between main plot and side quests. <br> The documentation is usually split into a graph showing the dependencies between activities and a textual description of each activity. As the plot is not strictly linear, and since many tasks can be accomplished in several ways, this will make the plot much easier to follow and to understand.
Dependency Graph
Textual information contained in the plot documentation has no special requirements regarding its form and appearance. This is different for the dependency graph however. As it is the glue for all the activity descriptions, it needs to follow a few conventions to be easily understandable and free of ambiguities. Below you will find the symbols explained that are used by the graph:
Paths are the connection between two activities. They indicate that the activity at the path’s origin needs to be completed before the player can carry on along that path. If additional requirements have to be met to follow a path, this can be indicated with an optional label. Often, two or more paths will lead to the same activity. This usually means that a player has so many different alternatives to reach that point. Whether those alternatives mutually exclude each other, or whether they can be pursued simultaneously needs to be described in the actual activities. At present there is no way to include this information in the graph itself.
Activities describe what options a player has if she wants to get on with the main plot or a side quest. Each activity has a unique numerical ID to easily identify the corresponding description and vice versa. It is further summarised with a few words. This should give readers a rough impression of the plot without having to refer to the textual descriptions. An activity can describe a singular option of the player, or a group of options with roughly the same result. In latter case, a subgraph can be used to depict a group in detail on a lower level. That prevents the top level graph from becoming cluttered with all the little details. Here the ID can be useful to indicate the level and to determine the relationship between activities on different levels. It has the form x on the top level, x.y on the second, x.y.z on the third and so on.
Key Points denote important events that have to be passed by all players. All key points together form a linear storyline that summarises the different paths a player may take through the game. This story line should be placed alongside the top level graph. Activities taking place at a certain key point should be aligned with it. Should the top level graph ever become too large to handle, it can be easily split into several parts with the key points as delimiters.
In the future we might introduce further symbols, or use colour codes to add more information to the dependency graph. But for a start these three symbols are all we need.
Example
Now that we’ve seen the theory of documenting the plot, a complete – albeit small – example will certainly help to understand how it is supposed to work. Each part of the example is ollowed by a brief commentary, to highlight and to explain the most important features.
Character description
 The Wizard  has been one of the king’s trusted advisors for many years - until recently
 In a vision he has seen the fall of the kingdom,  should the Princess ever follow her father
 onto the throne.  After sharing his fears with his liege, he was banned and driven out of
 the castle.  But being full of love for the kingdom, he carried off the  princess on the spot,
 to imprison her in his Tower.

 The Princess  ...
Note that the character description can become much longer and much more detailed.
Usually, it should include name, race and approximate age of characters. It may also list
what factions they belong to and what special talents they have. But for the sake of keeping
this example as short as possible, those details have been omitted.
Location description
 Wizard’s Tower  This is the home of the Wizard. It sits inmidst a lake on a small island.
 Various exotic trees and bushes grow along the shore of the lake. There is no obvious path
 across the water.
As long as the plot has no special requirements, a location’s exact appearance should be
left to the artists – as is the case in this example. If a certain layout is needed however, it
should be described in detail and accompanied by a sketch or map, if possible. In addition,
one may want to contact artists and map designers directly, to make sure they are aware of
any special wishes.
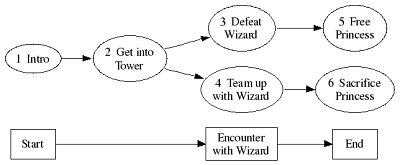
Top level Dependency Graph
Since the dependency graph gives a good overview of the plot as a whole, it makes sense to place it before the activity descriptions. Of course this requires properly labelled activities, otherwise it might just lead to confusion. Especially when implementing the plot, a good dependency graph will make life much easier for developers.
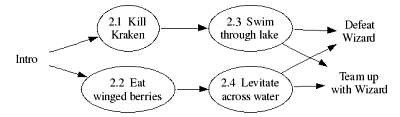
Second level Dependency Graph
To make the toplevel dependency graph clearer, it might make sense to group several
activities together. Here the toplevel Get intoTower activity has been split into four
nodes, and two different paths, on the second level. Incase of our example, this is already
sufficient. Larger plots might even require a third level, which should be the maximum number
of subdivisions though.
On levels different from the toplevel, no keypoints are required. However, all ‘entry’ and
‘exit’ activities should be included. The Ids used in the subgraph easily allow to identify the
toplevel activity –- no. 2 in this case.
Activity Description
 1  Intro  As one of the king’s knights, the player is sent to rescue the Princess from the
 Wizard’sTower. The game starts with him arriving in the tower area.

 2  Get into Tower  As the Princess is kept inside the tower, the first step is to get in there.
 There are multiple ways to accomplish this:

 2.1  Kill Kraken  A deadly beast guards the lake that surrounds the Wizard’s  Tower. If the
 player tries to swim to the other side, the kraken will catch and pull him beneath the surface.
 To kill the beast, he has to lure it near the shore and cut off its tentacles before they can
 reach and grab him.

 2.2  Eat winged berries  ...
The activities should be sorted alphabetically by their Id. Sublevel activities should be
inserted after the corresponding toplevel activity. The descriptions themselves should briefly
cover the situation and then list the actions required to complete that activity. This can be
done in form of a walkthrough, or in any other suitable way.