Tools:Dlgedit:Editing
After finishing the tutorial you should be able to start designing dialogues right away. But for your convenience, and because some of the advanced editor features are not described yet, this section contains the complete reference guide.
Command line switches
Although dlgedit is a graphical editor, there are a few command-line options you may find useful at times.
-c compile all SOURCES and exit
If the -c option is specified with a list of dialogue source files (recognizable by their .adlg suffix), these sources are turned into python dialogue scripts without invoking the graphical editor.
-d print pro ject directory and exit
A dialogue is usually assigned to a certain project, i.e a game. The project directory tells dlgedit where to search for things like character and quest data needed to compile dialogues.
-j project specify a default project
Assigns the given pro ject to new dialogues, or to dialogues that do not belong to a project yet. To properly compile dialogues, they usually need to belong to a project. Works in combination with the -c option.
-p path specify a custom pro ject directory
If your project/game does not reside in the default pro ject directory (which can be queried with the -d option), you can specify an alternative path with this option.
-v print version number and exit
You may specify a list of dialogue sources on the command line. Unless the -c switch is used, all of them will be opened in the editor. If no sources are given, it will start with a new, blank dialogue.
The Main Window

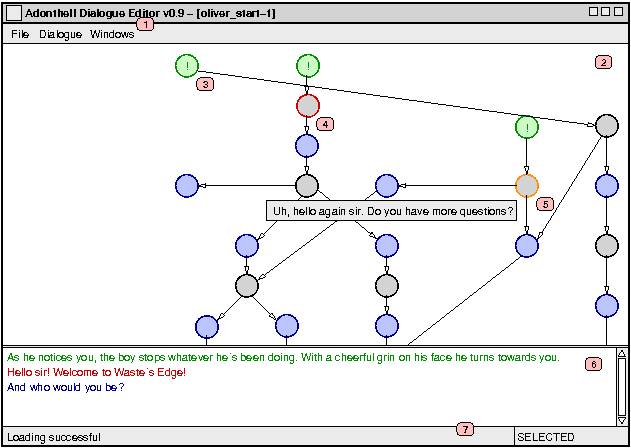
1. The Menu Bar
The File menu allows you to load and save dialogues. Multiple dialogues can be open at any time, in which case you can switch between them with the Window menu. The remaining menu options, mainly those in the Dialogue menu described below will operate on the dialogue currently displayed in the Dialogue Area.
- Settings This brings up a configuration dialog for pro ject specific options. See the Project Management chapter for details.
- Python Code This dialog lets you add arbitrary Python code to the resulting dialogue script’s constructor and destructor. The Python Scripting chapter explains in more detail what can be achieved with this.
- Preview Translation This option is only available when dlgedit was compiled with national language support (NLS). It allows you to load a binary catalogue file (with a .mo suffix) to see how well the translation has turned out. While in preview mode, indicated by the word PREVIEW in the StatusBar, no editing is possible. To return to normal editing mode, chose Dialogue->Exit Preview mode.
- Compile Create the Python dialogue script used by Adonthell from the current dialogue. Note that the dialogue in its current form will be compiled, not the version that might have been saved to disk earlier. If the compilation was successful, a <dialogue>.py file will be created next to the <dialogue>.adlg sourcefile.
- Execute Not yet implemented.
The Dialogue Area
This is where you create the outline of the dialogue; what lines of text exist and how they are linked to each other. Most of the work is done with the mouse, but there are also a few shortcuts on the keyboard and some functionality is available through the keyboard only.
The actions taken when a mouse- or key-press occurs depend on the current selection (none, circle, arrow) and the position of the cursor. The table below shows the possible constellations:
| Left-click | Nothing selected | Circle selected | Arrow selected |
| on empty space | Create new circle | Create new circle and link with selected | - |
| on circle | Select circle | Link with selected | - |
| on arrow | Select arrow | - | - |
| Middle-click | Nothing selected | Circle selected | Arrow selected |
| on empty space | - | Edit selected circle | - |
| on circle | Select and edit circle | Edit selected circle | - |
| on arrow | Select arrow | Edit selected circle | - |
| Right-click | Nothing selected | Circle selected | Arrow selected |
| wherever | - | Deselect circle | Deselect arrow |
| Enter | Nothing selected | Circle selected | Arrow selected |
| wherever | - | Edit circle | - |
| Del | Nothing selected | Circle selected | Arrow selected |
| wherever | - | Delete circle and its links | Delete arrow |
| Esc | Nothing selected | Circle selected | Arrow selected |
| wherever | - | Deselect circle | Deselect arrow |
Further key-commands are c, which centers the view on the selected node if it lies in the outer 20% of the Dialogue Area and the Cursor Keys to switch the selected node without using the mouse. Moving the mouse close to the Dialogue Area’s border will scroll the dialogue.